・フロントページを「index.php」と書き換える
・スクリーンショットファイルでテーマのサムネが表示される(サイズはw880h660、名前はscreenshot.png)
・CSSやjsなどのURLを「<?php echo get_temlate_directory_uri(); ?>/css/styles.css />」のように参照先を書き換える
・CSSファイルにテーマの宣言を記述する
・header.phpとfooter.phpに分ける
・<?php wp_header(); ?>と<?php wp_footer(); ?>を追加する(動作させるのに必要なテンプレタグ)
・必要であえれば<?php bloginfo(‘discription’); ?>でキャッチフレーズを、<?php bloginfo(‘name’); ?>でサイトタイトルを出力可能
・js、CSS、jQueryをファンクションファイルで管理する(一元管理するためアクションフックを利用)※コンフリクトが起きるためHTMLヘッド内の読み込み3行は削除する
<?php function my_enqueue_scripts(){
  wp_enqueue_script('jquery');
  wp_enqueue_script('bundle_js',get_template_directory_uri().'/assets/js/bundle.js',array());
  wp_enqueue_style('mystyles',get_template_directory_uri().'/assets/css/styles.css',array());
}
add_action('wp_enqueue_scripts','my_enqueue_scripts');
・投稿ページのパーマリンクを変更する(カスタム構造「/archives/%post_id%/」)
・WP Multibyte Patchプラグインをインストールする(日本語版Wordpressの不具合を解消するためのプラグイン)
・設定→表示設定を固定ページトップページにする(これで固定のhomeファイルがトップページとして設定される)
・どのテンプレファイルを参照しているかをブラウザで表示するために「Show Current Template」をインストールする
・何もファイルがない時にindex.phpを読み込ませるファイルとしておくため、トップページ読み込み用ファイル「front-page.php」を作成する
・page.phpを作成して固定ページを出力するためのテンプレを用意する
<?php get_header(); ?>
<div class="page-main">
  <div class="lead-inner">
    <?php
    if (have_posts()) :
      while (have_posts()) : the_post();
        the_content();
      endwhile;
    endif;
    ?>
  </div>
</div>
<?php get_footer(); ?>
・header.phpでmvを表示しているため、下層とトップをif文で分岐させる(フッターも併せて追加)
・functions.phpに以下を記述し、カスタムメニューを有効化する
register_nav_menus(
array(
'place_global'=>'グローバル',
'place_footer'=>'フッターナビ',
)
);
これを記述すると外観にメニューが表示される

グロナビは基本ヘッダーとフッターにあるので、メニュー名を「global」「footer」として表示させたい任意のメニューで作成する。同メニューでいいなら1つでもよい。
リンクも付与したい場合はカスタムリンクを使えばURLを貼ることも可能
この作業をすることによりulでリスト化されているグロナビを、phpで出力することができる
            <ul class="menu">
              <li class="menu-item">
                <a class="nav-link active" href="#">ホーム</a>
              </li>
              <li class="menu-item">
                <a class="nav-link" href="#">企業情報</a>
              </li>
              <li class="menu-item">
                <a class="nav-link" href="#">店舗情報</a>
              </li>
              <li class="menu-item">
                <a class="nav-link" href="#">地域貢献活動</a>
              </li>
              <li class="menu-item">
                <a class="nav-link" href="#">ニュースリリース</a>
              </li>
              <li class="menu-item">
                <a class="nav-link" href="#">お問い合わせ</a>
              </li>
            </ul>
↓
<?php
wp_nav_menu(
array(
'theme_location'=>'place_global',
'container'=>false,
)
);
?>
globalの部分が決めたメニュー名になる
falseでメニューをdivで囲わないように命令している
以下フッターメニュー
<?php
wp_nav_menu(
array(
'theme_location'=>'place_footer',
'container'=>false,
)
);
?>
・投稿ページをWordpressで読み込ませる(投稿時間、タイトル、コンテンツの3カ所)
                  <div class="main-container">
                    <div class="main-wrapper">
                      <?php
                      if(have_posts()):
                        while(have_posts()):the_post();
                        ?>
                      <div class="news">
                        <time class="time"><?php the_time('y.m.d'); ?></time>
                        <p class='title'><?php the_title(); ?></p>
                        <div class="news-body">
                        <?php the_content(); ?>
                        </div>
                      </div>
                      <div class="more-news">
                        <div class="next">
                          <a class="another-link" href="#">NEXT</a>
                        </div>
                        <div class="prev">
                          <a class="another-link" href="#">PREV</a>
                        </div>
                      </div>
                      <?php endwhile;
                      endif;
                      ?>
                    </div>
                  </div>
・MVのタイトルをheaderで切り分けていないので、投稿ページのカテゴリー名を出力するように分岐させる(functions.phpの関数呼び出しで管理)
function get_main_title(){
  if(is_singular('post')):
    $category_obj = get_the_category();
    return $category_obj[0]->name;
    elseif (is_page()):
      return get_the_title();
    endif;
}
この関数をheaderで呼び出して使用する。is_singular()で投稿ページが投稿ページの判定、(‘post’)で表示中の判定をオプションで付けている。is_page()は固定ページの表示中判定※引数なしで表示中も判定している。オプションでis_page(42)などとすることでID42の固定ページの場合の判定も可能。
         <div class="page-head">
                <img src="<?php echo get_template_directory_uri(); ?>/assets/images/bg-page-company.jpg" alt="" />
                <div class="wrapper">
                  <span class="page-title-en"></span>
                  <h2 class="page-title"><?php echo get_main_title(); ?></h2>
                </div>
              </div>
↑get_the_title();と単純にページタイトルを取得していた箇所をget_main_title();として分岐用関数を呼び出した。
・必要であればファイルをインクルード化する(content-single,phpやcontent-archiveに切り分けてテンプレートパートで呼び出し)
・archive.phpを作成し、カテゴリー一覧ページを作成する(URLは管理画面のカテゴリーで設定済み)
投稿ページ(single.php)と同じ要領で進める。URL呼び出しが<?php the_permalink(); ?>になるところが相違点。
<?php get_header(); ?>
<div class="page-inner full-width">
  <div class="page-main" id="pg-news">
    <div class="main-container">
      <div class="main-wrapper">
        <div class="newsLists">
          <?php
          if (have_posts()) :
            while (have_posts()) : the_post();
          ?>
              <a class="news-link" href="<?php the_permalink(); ?>">
                <div class="news-body">
                  <time class="release"><?php the_time('Y.m.d'); ?></time>
                  <p class="title"><?php the_title(); ?></p>
                </div>
              </a>
          <?php endwhile;
          endif;
          ?>
        </div>
      </div>
    </div>
  </div>
</div>
<?php get_footer(); ?>
カテゴリーページのタイトル出力分岐を追加する。(functions.php)
function get_main_title()
{
  if (is_singular('post')) :
    $category_obj = get_the_category();
    return $category_obj[0]->name;
  elseif (is_page()) :
    return get_the_title();
  elseif (is_category()) :
    return single_cat_title();
  endif;
}
・親ページを基点にサブクエリで子ページを出力する
<?php get_header(); ?>
			  <div class="page-inner">
                <div class="page-main" id="pg-common">
                  <ul class="commons">
                    <?php
                    $parent_id = get_the_ID();
                    $args = array(
                      'posts_per_page' => -1, //取得したい件数を表示。-1は全件
                      'post_type' => 'page',  //取得する投稿タイプ(pageは固定ページ)
                      'prderby' => 'menu_order',//取得する並び指定(munu_orderは管理画面の並び)
                      'order' => 'ASC', //昇順降順
                      'post_parent'=> $parent_id, //上で代入した変数を設定
                    );
                    $common_pages = new WP_Query($args);
                    if($common_pages->have_posts()):
                      while($common_pages->have_posts()):$common_pages->the_post();
                     ?>

                    <li class="common-item">
                      <a class="common-link" href="<?php the_permalink(); ?>">
                        <div class="common-image">
                          <?php the_post_thumbnail(); ?>
                        </div>
                        <div class="common-body">
                          <p class="name"><?php the_title(); ?></p>
                          <p class="caption"><?php echo get_the_excerpt(); ?></p>
                          <div class="buttonBox">
                            <button type="button" class="seeDetail">MORE</button>
                          </div>
                        </div>
                      </a>
                    </li>
                    <?php endwhile;
                    wp_reset_postdata();
                    endif;
                    ?>
                  </ul>
                </div>
              </div>
<?php get_footer(); ?>
argsに子ページの情報を格納した後、インスタンスを生成し取り出す。parent_idに親ページ(このファイル)のidを代入しているが、直接post_parentに代入してもよい。if文で記事があるか判定し、whileで記事がある間取り出す処理をしている。サブクエリを取得した後はwp_reset_postdata();で閉じる。
・上記の処理をfunctions.phpで管理する(任意で中身も別ファイルで読み込む※今回は割愛)
・アイキャッチ画像を有効化する(引数で画像をリサイズできるように準備する※適宜)
//アイキャッチ有効化
add_theme_support('post-thumbnails');

add_image_size('top',1077,622,true);

add_image_size('contribution',577,280,true);
・サブクエリを利用して子ページ情報を取得し表示する
        <?php
        $shop_obj = get_page_by_path('shop');
        $post = $shop_obj;
        setup_postdata($post);
        $shop_title=get_the_title();
        ?>
        <span class="section-title-en">Shop Information</span>
        <h2 class="section-title"><?php the_title(); ?></h2>
        <p class="section-lead"><?php echo get_the_excerpt(); ?></p>
        <?php wp_reset_postdata(); ?>
get_page_by?path(‘shop’);でスラッグshopのページ情報を取得し、setup_postdata($post);でセットすると、<?php wp_reset_postdata(); ?>の範囲まで取得情報をセットしたページ情報にすることができる。
これを利用してテキストをWordpressから出力する(get_the_title();は後に使うために変数に代入してリセット後も利用できるようにした。
・投稿ページを取得したときの要領でトップページもループで取得する。
※get_child_pages();関数で表示中のページの子ページを呼び出してループしているので、現在functions.phpで管理しているこの関数ではTOPページのidを取得することになる。
これを任意の親ページidに変更したいので、引数で呼び出せるように修正する。
function get_child_pages($number=-1,$specified_id = null){
  if(isset($specified_id)):
    $parent_id = $specified_id;
  else:
    $parent_id = get_the_ID();
  endif;
  $args = array(
    'posts_per_page' => $number,
    'post_type' => 'page',
    'prderby' => 'menu_order',
    'order' => 'ASC',
    'post_parent'=> $parent_id,
  );
  $child_pages = new WP_Query($args);
  return $child_pages;
}
第二引数($specified_id)を指定すればその値が入り、指定されていなければnullを返す。issetは中身がnullならfalse、値があればtrueを返すので、呼び出し元で引数をセットすればその値を、しなければそのまま表示中のidを返す処理が可能。
          <?php
          $shop_pages = get_child_pages(4,$shop_obj->ID);
          if ( $shop_pages -> have_posts() ):
            while( $shop_pages -> have_posts() ) : $shop_pages -> the_post();
            ?>
引数に店舗情報ページのIDをセット。表示数を4でオーバーライドする。
・URLをWordpressから出力※投稿タイプからの遷移なのでエスケープ処理をする
        <div class="section-buttons">
          <button type="button" class="button button-ghost" onclick="javascript:location.href = '<?php echo esc_url(home_url('shop')); ?>';">
            <?php echo $shop_title; ?>一覧を見る
          </button>
        </div>
javascriptでリンクさせているが、機能はaタグと同じ。
・必要なセクションを同様の手順で出力
・ニュースカテゴリーを一覧で表示
 <section class="section-contents" id="news">
      <div class="wrapper">
        <?php $term_obj = get_term_by('slug','news','category'); ?>
        <span class="section-title-en">News Release</span>
        <h2 class="section-title"><?php echo $term_obj->name; ?></h2>
        <p class="section-lead"><?php echo $term_obj->description; ?></p>
        <ul class="news">
          <?php
          $args = array(
            'post_type'=>'post',
            'category_name'=>'news',
            'posts_per_page'=>3,
          );
          $news_posts = new WP_Query($args);
          if($news_posts->have_posts()):
            while($news_posts->have_posts()):$news_posts->the_post();
            ?>

          <li class="news-item">
            <a class="detail-link" href="<?php the_permalink(); ?>">
              <time class="time"><?php the_time('Y.m.d'); ?></time>
              <p class="title"><?php the_title(); ?></p>
              <p class="news-text"><?php echo get_the_excerpt(); ?></p>
            </a>
          </li>
          <?php
          endwhile;
          wp_reset_postdata();
          endif;
          ?>
        </ul>
        <div class="section-buttons">
          <button type="button" class="button button-ghost" onclick="javascript:location.href = '#';">
            ニュースリリース一覧を見る
          </button>
        </div>
      </div>
    </section>
<?php $term_obj = get_term_by(‘slug’,’news’,’category’); ?>第一引数のスラッグはid,slug,nameの三つから選択可能。第二引数に値、第三引数にタームが属するタクソノミーを指定する。
<?php $term_obj = get_term_by(‘slug’,’news’,’category’); ?>第一引数のスラッグはid,slug,nameの三つから選択可能。第二引数に値、第三引数にタームが属するタクソノミーを指定する。取得方法は異なるものの、表示ロジックは投稿ページ等と同じ。
・上記もfunctionで管理する。
function get_specific_posts($post_type,$taxonomy = null,$term = null,$number = -1){
  $args=array(
    'post_type'=>$post_type,
    'tax_query'=>array(
      array(
        'taxonomy'=>$taxonomy,
        'field'=>'slug',
        'terms'=>$term,
      ),
    ),
    'post_per_page'=>$number,
  );
  $specific_posts = new WP_Query($args);
  return $specific_posts;
}
arrayリストで情報を管理する。Wordpressではtax_queryというパラメーターがあり、ここでまとめて管理することができる。
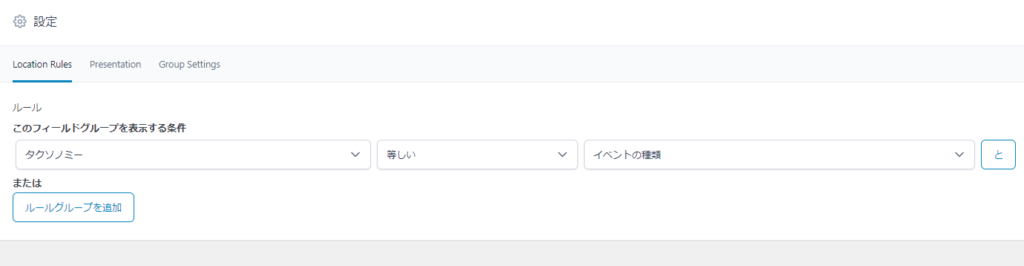
・カスタム投稿を実装する(Custom Post Typeをインストールする)
・管理画面にCPT UIが出るので、投稿タイプを追加した後タクソノミーを追加してチェックボックスから紐づける。階層をtrueにするとチェックボックスからのタグ付けが可能になる。
・これで投稿ページ同様の投稿が可能になる。
<?php get_header(); ?>
<div class="page-inner">
  <div class="page-main" id="pg-contribution">
    <div class="contribution">
      <?php
      $terms = get_terms('event');
      foreach ($terms as $term) :
        include 'content-contribution.php';
      endforeach; ?>
    </div>
  </div>
</div>
<?php get_footer(); ?>
<article class="article-card">
<a class="card-link" href="<?php echo get_term_link($term); ?>">
<div class="image"><img src="<?php echo get_template_directory_uri(); ?>/assets/images/bg-page-dumy.png"/></div>
<div class="body">
<p class="title"><?php echo $term->name; ?></p>
<p class="excerpt"><?php echo $term->description; ?></p>
<div class="buttonBox">
<button type="button" class="seeDetail">MORE</button>
</div>
</div>
</a>
</article>カスタム投稿のtermはオブジェクトではなく変数で格納されているため、get_template_part();では参照することができない。よって、includeを利用して中身を呼び出す必要がある。
・カスタム投稿のターム一覧用にtaxonomy.phpを作成する。(現在はarchive.phpを参照している)
<?php get_header(); ?>
<div class="page-inner">
  <div class="page-main" id="pg-contribution">
    <div class="contribution">
      <?php $term = get_specific_posts('daily_contribution','event',$term,-1);
      if($term->have_posts()):
        while($term->have_posts()):$term->the_post();
        get_template_part('content-tax');
      endwhile;
      wp_reset_postdata();
    endif;
    ?>
    </div>
  </div>
</div>
<?php get_footer(); ?>
中身をインクルード化(content-tax.phpを作成して読み込む)
                    <article class="article-card">
                      <a class="card-link" href="<?php the_permalink(); ?>">
                      <div class="image"><img src="<?php the_post_thumbnail(); ?></div>

                        <div class="body">
                          <p class="title"><?php the_title(); ?></p>
                          <p class="excerpt"><?php echo get_the_excerpt(); ?></p>
                          <div class="buttonBox">
                            <button type="button" class="seeDetail">MORE</button>
                          </div>
                        </div>
                      </a>
                    </article>
・フロントページでもカスタム投稿されたコンテンツを呼び出す(固定ページ呼びだし用に作ったテンプレートを修正する
function get_specific_posts($post_type,$taxonomy = null,$term = null,$number = -1){

  if(!$term):
    $term_obj = get_term('taxonomy');
    $term = wp_list_pluck($terms?obj,'slug');
    endif;

  $args=array(
    'post_type'=>$post_type,
    'tax_query'=>array(
      array(
        'taxonomy'=>$taxonomy,
        'field'=>'slug',
        'terms'=>$term,
      ),
    ),
    'post_per_page'=>$number,
  );
  $specific_posts = new WP_Query($args);
  return $specific_posts;
$contribution_pages = get_specific_posts('daily_contribution','event','',3);
if)$contribution_pages->have_posts()):第三引数のtermを空にしたときにif文で分岐させ取得する。get_terms()でタームをすべて取得し、$terms_objへ格納。格納した$term_objのスラッグをwp_list_pluck($terms_obj,’slug’);で取得している。
フロントページではこの関数を呼び出している。
・Advanced Custom Fieldsプラグインでカスタム投稿の画像を表示する

function get_main_image(){
if(is_page()||is_singular('daily_contribution')):
$attachment_id=get_field('main_image');
return wp_get_attachment_image($attachment_id,'detail');
固定ページか地域貢献活動なら入る場合にカスタムフィールドで設置したメイン画像を出力するコード。get field(‘main_image’)でidを取得している。(今回割愛しているが、main_imageはカスタムフィールドで自身で設定した値。wp_get_attachment_image($attachment_id,’detail’);の第一引数で取得したい画像のidを、第二引数で画像サイズを設定する。detailは自身で設定した関数。
・同様にタクソノミー(地域貢献活動一覧)の画像も投稿可能にする。
<?php
$image_id=get_field('event_image',$term->taxonomy.'_'.$term->term_id);
echo wp_get_attachment_image($image_id,'contribution');
?>
idの取得方法が上記と異なるので注意。get_field(‘フィールド名’,’カスタム分類(タクソノミー)のスラッグ_タームID’)でメタデータを取得できる。
functions.phpを修正して同様にメイン画像も出力する。
elseif(is_tax('event')):
$term_obj=get_queried_object();
$image_id=get_field('event_image',$term_obj->taxonomy.'_'.$term_obj->term_id);
return wp_get_attachment_image($image_id,'detail');
get_queried_object()で現在クエリされているオブジェクトを取得できる。